Questions about Palestine or Israel?

At least 34,000 killed in Gaza, more than 25,000 woman and children! 1,200 in Israel. End the OCCUPATION!
-
BUT Israel left Gaza in 2005? Did they not?
According to all human rights organisations including Israels own expert on International law Yorum Dinstein agree that Israel simply redeployed its troops from inside Gaza to the perimiter of Gaza. They all state that if Israel controlled what went into Gaza, what went out of it, Its airspace and its water, Israel was effectively occupying…
-
Is Israel a terrorist state?
Israel since its inception Israel has used violence as a detterent against the occupied population. Whilst smearing the entirety of Israel may be incorrect, it exhibits all the signs of a terrorist organisation such as: it comes as no surprise that the former Irgun terrorist group was party absorved into the IDF military and the…
-
Is hamas deemed a terrorist organisation?
Hamas was founded in 1987 as an alternative modern movement to the PLO. Hamas has a military wing and a political wing. Hamas is the legitimate government of Gaza and won the election in 2006 by a marginal vote. However no election has since taken place even though Hamas has called for it every year.…
-
Are all Israelis complicit / responsible for this situation?
Smearing a large brush across is an easy thing to do, but often the wrong thing. Most israelis are sold the dream of the Jewish state very elegantly (all paid for) and once they realise the situation – they have protested or even left Israel. The right wing government however fuel the fires and further…
-
What claims have been debunked (Palestine-Israel conflict) so far?
On October the 7th, 2023 – Hamas the governing body of Gaza carried out an attack on Israel. The aftermath and claims of this attack were as follows: Claim Proof Debunked? Explanation 40 babies beheaded – Western media repeating.– President Joe Biden stating he has seen the pictures and evidence. Yes The statement was retracted…
-
What can I do as a citizen of the UK to not be complicit in potential war crimes?
We all are worried about the worsening situation in Gaza. What makes it worst is that the western powers are supporting the already 4th strongest military in the world to bomb a civilian population. As a citizen of the united kingdom, you can withold your tax money where there is a possibility of the money…
-
What is antisemetism and Zionism?
Antisemetism: hostility to or prejudice against Jewish people. Antizionism: hostility to or prejudice against the Zionist project. This is where the lines get blurred. Zionism is a political ideology which seeks to overtake the land of Palestine and its neighbors (Jordan, Egypt) to form ‘Greater Israel’. Its being carried out by the government of Israel along with the US (AIPAC +…
-
Do Jews not deserve a homeland?
Ofcourse, take all the land that you want. Preferably buy it? What Israel has done though: If Israel wanted, with the money it has received in aid from the US and created its country with – it could have offered to buy the land like civilised humans but instead they have forced people out of…
-
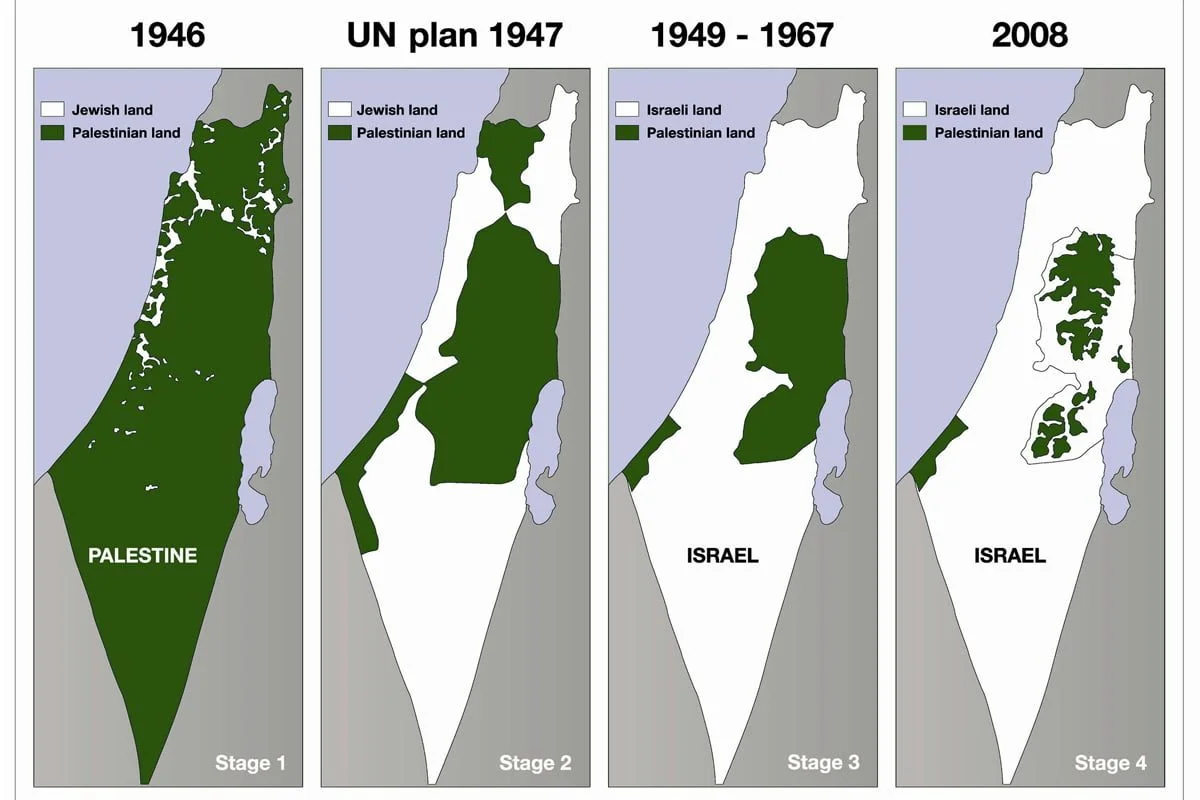
Where are Palestine’s borders?
Hard to say. Given Israel illegally annexes land every now and then for people (under so called birthright) that carry the job of occupying the land for Israel – the picture keeps on changing. The land map has always been changed after being occupied first. Currently Israel is illegally occupying areas following from the 1967…
-
Does Hamas use human shields?
The argument is used to defend the idea that the civilian causalities in Israels aggression stems from the fact that Hamas is positioned within civilian population. Whilst this may be true due to the dense population of Gaza, it doesn’t serve as a defence and here is why: Israel has not spared any building, whether…